Are Treadmills FSA Eligible? Home Gym Layout & Belt Maintenance
Learn if treadmills are FSA eligible, how to optimize your home gym layout, and master treadmill belt maintenance and lubrication for longevity.

Are Treadmills FSA Eligible? Funding Your Home Gym in 2026
When designing a space-optimized home gym, the financial layout is just as critical as the physical footprint. A common question we receive from readers optimizing their budgets is: are treadmills FSA eligible? The short answer is no, not by default. According to IRS Publication 502, general fitness equipment purchased for overall health and wellness does not qualify for Flexible Spending Account (FSA) or Health Savings Account (HSA) reimbursement.
However, there is a critical exception. If a licensed physician prescribes a treadmill to treat a specific, diagnosed medical condition—such as severe obesity, hypertension, or cardiovascular rehabilitation—it may become eligible. To utilize your FSA funds, you must obtain a Letter of Medical Necessity (LMN) from your doctor before purchasing the equipment. The LMN must explicitly state the medical diagnosis and explain why a home treadmill is a required treatment rather than a general fitness tool. For a deeper breakdown of qualifying medical expenses, refer to this guide on FSA-eligible items from Healthline.
FSA Eligibility Decision Matrix
- Scenario A: Buying a treadmill for general weight loss and cardio. Result: Not FSA Eligible.
- Scenario B: Buying a treadmill with an LMN for prescribed cardiac rehab. Result: FSA Eligible (Requires LMN and itemized receipt).
- Scenario C: Paying for treadmill belt maintenance and repair. Result: Not FSA Eligible (Maintenance is considered a general upkeep expense, not a medical treatment).
Space Optimization: Layout Dimensions and Safety Clearances
Once you have secured your funding or finalized your budget, the physical layout of your treadmill becomes the next hurdle. Space optimization is not just about making the room look larger; it is about ensuring proper airflow, user safety, and long-term machine health. Many homeowners push treadmills flush against walls or into tight corners, which directly leads to mechanical failure.
The Mandatory Clearance Zones
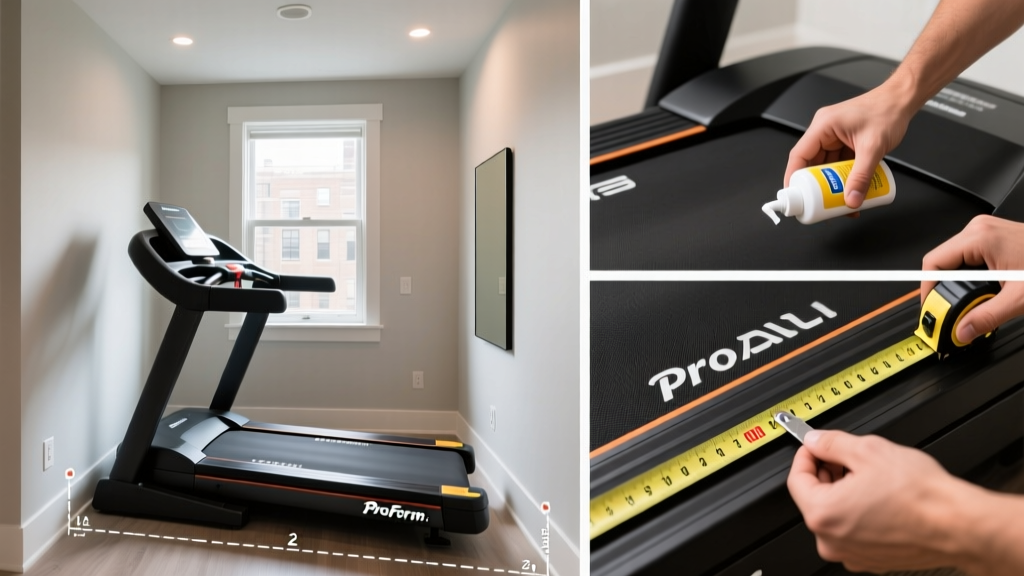
To optimize your layout safely, adhere to these non-negotiable clearance dimensions:
- Lateral Clearance (Sides): Maintain at least 20 inches on both the left and right sides of the treadmill. This accommodates natural arm swing, prevents knuckle-scraping against walls, and allows for safe emergency dismounts.
- Rear Deceleration Zone: You must leave a minimum of 78 inches (6.5 feet) of clear space directly behind the treadmill. If a user trips or falls off the back of a moving belt, this zone provides the necessary distance for the body to decelerate safely without striking a wall or furniture.
- Front Clearance: Leave at least 12 inches in front of the motor hood for ventilation and access to the power cord.
The Ceiling Height Formula
When placing a treadmill in a basement or a room with standard 8-foot ceilings, you must calculate the peak user height. The formula is: Treadmill Deck Height + User Height + 5 Inches (for head bounce and arm reach). For example, the NordicTrack Commercial 1750 has a deck height of roughly 9.5 inches. A 6-foot-tall user (72 inches) would need a minimum ceiling height of 86.5 inches (7 feet 2.5 inches) to run comfortably without grazing the ceiling.
The Hidden Cost of Poor Placement: Dust, Heat, and Belt Degradation
How does space layout affect treadmill belt maintenance? The environment immediately surrounding your machine dictates the lifespan of its moving parts. Placing a treadmill directly on a plush carpet in a cramped, unventilated corner creates a perfect storm for mechanical degradation.
Carpets generate static electricity and harbor microscopic dust, pet dander, and fibers. The treadmill's motor fan acts like a vacuum, sucking these particles into the motor housing and underneath the belt. This debris mixes with the factory-applied lubricant, creating a gritty paste that increases friction, generates excessive heat, and ultimately destroys the belt backing and the motor control board. To protect your investment, always place your treadmill on a dedicated 3/16-inch PVC or rubber equipment mat that extends at least 6 inches beyond the machine's footprint on all sides.
Masterclass: Treadmill Belt Maintenance and Lubrication
Even in a perfectly optimized, climate-controlled space, treadmill belts require regular maintenance. The friction between the walking belt and the deck generates immense heat. Without proper lubrication, the motor works harder, drawing more amps, which can trip your home gym's circuit breaker or burn out the drive motor.
Selecting the Right Lubricant
Never use WD-40, petroleum-based oils, or household silicone sprays containing propellants. These will melt the belt backing and ruin the deck. You must use 100% pure liquid silicone treadmill lubricant. A standard 4-ounce bottle costs between $12 and $15 and will last for multiple applications. Brands like Horizon Fitness, Sole, and Impresa offer reliable, manufacturer-approved formulas.
Step-by-Step Lubrication and Tension Protocol
- Power Down: Unplug the treadmill from the wall to eliminate any risk of accidental startup or electrical shock.
- Check Belt Tension: Reach under the center of the belt and lift it. It should raise exactly 2 to 3 inches off the deck. If it lifts higher, the belt is too loose and will slip during use. If it barely lifts, it is too tight and will strain the motor. Adjust the rear roller bolts accordingly using the provided Allen wrench (turn clockwise to tighten, counter-clockwise to loosen, exactly one-quarter turn at a time).
- Apply Lubricant: Loosen the belt slightly if necessary. Slide the applicator nozzle under the belt, as close to the center of the deck as possible. Squeeze exactly 1 ounce (half a standard bottle) of silicone in a zigzag pattern from the center toward the left edge. Repeat the process on the right side.
- Distribute the Silicone: Plug the treadmill back in. Start the machine at a slow walking pace of 3.0 mph. Let it run for 3 to 5 minutes. The movement of the belt will naturally spread the silicone evenly across the entire deck surface.
- Wipe Excess: Stop the machine and use a clean, dry microfiber cloth to wipe away any silicone that has squeezed out onto the edges of the belt or the side rails. Excess silicone on the rails is a slipping hazard for the user.
Troubleshooting Belt Issues in Space-Constrained Gyms
When your home gym layout forces the treadmill into less-than-ideal environmental conditions, specific mechanical symptoms will arise. Use this diagnostic matrix to identify and resolve belt issues.
| Symptom | Probable Cause | Space/Layout Factor | Corrective Action |
|---|---|---|---|
| Belt slips or hesitates when stepping on it | Loose belt tension or worn drive belt | Vibration from uneven flooring in cramped spaces | Tighten rear roller bolts by 1/4 turn; check motor hood drive belt. |
| Fraying or curling edges on the walking belt | Belt misalignment or chronic under-lubrication | Wall-scraping due to inadequate lateral clearance | Re-center belt using left/right adjustment bolts; apply 100% silicone. |
| Burning rubber smell or hot deck | Extreme friction from dry belt or debris buildup | Placed directly on carpet; poor motor ventilation | Move to PVC mat; vacuum under motor hood; lubricate deck immediately. |
| Motor shuts off abruptly mid-workout | Thermal overload switch triggered | Flush against a wall, blocking rear cooling fan exhaust | Ensure 12+ inches of front/rear clearance; let motor cool for 30 mins. |
Expert Layout & Maintenance Checklist
To ensure your home gym remains a safe, efficient, and financially optimized space, run through this quick checklist every six months:
- Clearance Audit: Verify 20 inches of side clearance and 78 inches of rear clearance are completely unobstructed.
- Mat Inspection: Check the equipment mat for tearing or bunching, which can cause the treadmill to sit unevenly and throw off belt alignment.
- Lubrication Schedule: Apply 1 oz of 100% silicone lubricant per side every 150 miles of use, or every 3 to 6 months, whichever comes first.
- Vacuum Protocol: Use a soft brush attachment to vacuum the seams of the belt and the motor hood vents to prevent static-charged dust from entering the electronics.
- FSA Documentation: If you used an FSA/HSA to purchase the machine via an LMN, keep the receipt, the LMN, and your doctor's notes in a dedicated tax folder for at least three years in case of an IRS audit.
By treating your home gym layout as a holistic system—where financial eligibility, spatial geometry, and mechanical maintenance intersect—you will maximize the lifespan of your treadmill and the safety of your workouts. For more specific guidance on your machine's exact maintenance intervals, always consult the manufacturer's official support hub or your owner's manual.
More gear to consider
All reviews
Stair Climber vs Treadmill for Weight Loss: Elliptical vs Treadmill

Rowing Machine Buying Guide & Technique: Beyond the Barry's Treadmill
Is a Treadmill Helpful in Losing Weight? Walking Pad Setup & Review

How Big Is a Treadmill Box? Sizing & Maintaining Compact Cardio

Treadmill Belt Keeps Moving to the Left? Curved vs Motorized Fixes