Rack Storage and Care for a 30-Minute Home Dumbbell Workout
Optimize your 30-minute home dumbbell workout with expert rack storage solutions, material-specific maintenance, and longevity tips for your gear.

The Hidden Cost of Poor Dumbbell Storage
When you are mid-way through a high-intensity 30-minute home dumbbell workout, every second counts. Transition times between supersets and circuits should be measured in mere breaths, not minutes spent tripping over scattered hex dumbbells or wrestling a jammed weight off a warped rack. A cluttered, poorly maintained home gym doesn't just ruin your flow; it actively degrades your equipment. According to facility safety and maintenance guidelines highlighted by the National Strength and Conditioning Association (NSCA), improper storage and environmental neglect are leading causes of premature equipment failure and home gym injuries.
If your goal is to maximize the density and effectiveness of a 30-minute home dumbbell workout, your storage infrastructure must be as dialed-in as your programming. In this guide, we break down the structural mechanics of dumbbell racks, material-specific maintenance protocols, and the exact steps required to ensure your free weights and storage solutions survive decades of heavy use.
Rack Configurations for Rapid Circuit Transitions
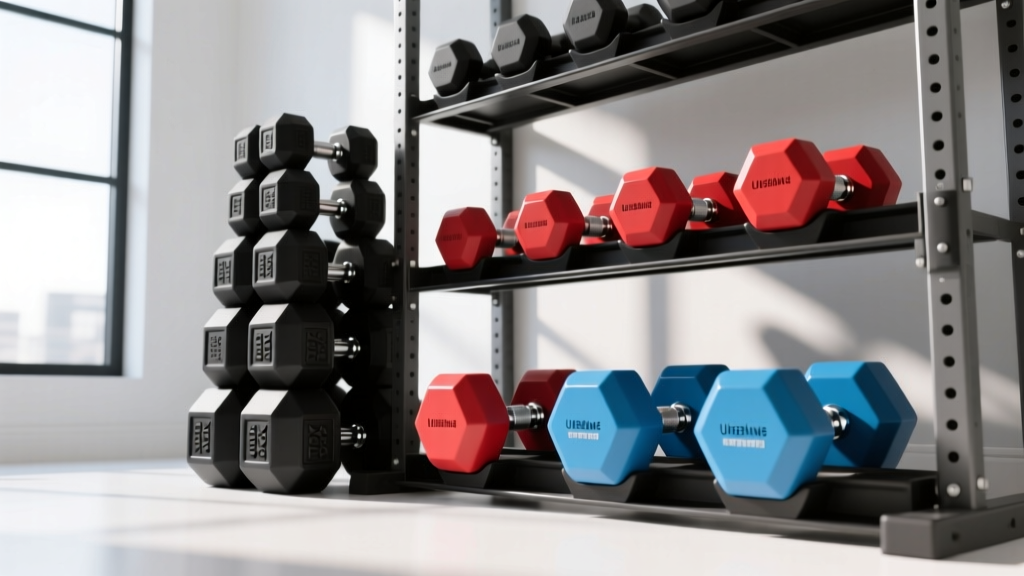
Not all dumbbell racks are created equal, especially when floor space and transition speed are at a premium. Choosing the wrong storage solution can add 3 to 5 minutes of cumulative fumbling to a fast-paced session. Below is a structural and functional comparison of the three most common home gym dumbbell storage configurations.
| Rack Configuration | Footprint (Approx.) | Transition Speed | Structural Load Limit | Best Use Case | Price Range |
|---|---|---|---|---|---|
| Horizontal 3-Tier Rack | 48" x 24" | Fastest (Eye-level pairing) | 800 - 1,200 lbs | Full sets (5-50 lbs), rapid drop-sets | $175 - $250 |
| A-Frame Tower | 26" x 26" | Moderate (Requires bending) | 400 - 600 lbs | Small spaces, limited sets (e.g., 3 pairs) | $80 - $130 |
| Vertical Dumbbell Tower | 12" x 12" | Slowest (Lifting over other weights) | 300 - 500 lbs | Neoprene/Vinyl aerobics sets, light rehab | $40 - $70 |
For a serious 30-minute home dumbbell workout that utilizes drop-sets or complex circuits, the Horizontal 3-Tier Rack is the undisputed king. Models like the Rogue Fitness 3-Tier Dumbbell Storage Rack or the Rep Fitness SR-4000 Dumbbell Tray allow you to store pairs symmetrically at waist, chest, and eye level. This eliminates the need to squat or bend over to retrieve heavier weights, preserving your lower back for the actual workout.
Material-Specific Maintenance Protocols
Dumbbells and racks are manufactured from vastly different materials, each with unique failure modes. Treating a urethane dumbbell like a chrome dumbbell will result in irreversible chemical damage. Here is how to care for the specific materials in your arsenal.
1. Urethane vs. Rubber Dumbbells
Urethane is the gold standard for premium home gyms. It is highly resistant to UV degradation, sweat, and ozone. However, cleaning urethane with harsh household chemicals (like bleach or ammonia-based glass cleaners) will break down the polymer chains, leading to a sticky, degraded surface. Protocol: Wipe urethane dumbbells down with a microfiber cloth dampened with warm water and a pH-neutral dish soap.
Virgin rubber dumbbells, while cheaper, are prone to off-gassing and drying out. If exposed to direct sunlight or ozone-generating equipment (like certain air purifiers), rubber will crack and crumble. Apply a water-based rubber protectant (like 303 Aerospace Protectant) every six months to retain moisture and prevent UV cracking.
2. Chrome and Steel Rack Care
Chrome-plated dumbbells and steel racks are highly susceptible to humidity-induced pitting. Many lifters make the critical mistake of using standard WD-40 to clean chrome. Standard WD-40 is primarily a solvent; it will strip away existing protective oils and accelerate rusting over time. Protocol: Use WD-40 Specialist Corrosion Inhibitor or 3-IN-ONE Multi-Purpose Oil. Apply a light mist to a rag and wipe down the chrome handles and the steel cradles of your rack once a month to displace ambient moisture.
Expert Warning: The Sweat Corrosion FactorHuman sweat is highly acidic and contains chlorides that aggressively attack zinc and chrome plating. If you are performing high-sweat conditioning during your 30-minute home dumbbell workout, failing to wipe down the knurled handles and the rack's contact points within 2 hours post-workout will result in permanent micro-pitting and rust stains within weeks.
Structural Integrity: Rack Bolt Torque and Shear Stress
A fully loaded 3-tier rack holding 150 lbs of dumbbells per tier exerts significant downward and outward shear stress on the frame. Most modular racks utilize Grade 5 or Grade 8 hex bolts secured into welded barrel nuts. Over time, the micro-vibrations from dropping dumbbells back onto the cradles will cause these bolts to back out.
According to equipment manufacturing insights from Rogue Fitness and general structural engineering standards for gym equipment, rack sway is a primary precursor to catastrophic weld failure. You must perform a torque check every 90 days.
Step-by-Step Rack Torque and Alignment Check
- Clear the Rack: Remove all dumbbells to eliminate variable load stresses.
- Inspect Welds: Run your thumb along the interior welds of the cradles. Look for hairline fractures or paint flaking, which indicate metal fatigue.
- Torque the Hardware: Using a calibrated torque wrench, tighten all structural bolts to the manufacturer's specification (typically 45 to 55 ft-lbs for heavy-duty 11-gauge steel racks). Do not overtighten, as this can strip the threads inside the welded nuts.
- Check Leveling Feet: Ensure all rubber or urethane leveling feet are making flush contact with the floor. A 2mm gap on one foot can increase torsional stress on the frame by up to 30% when loading heavy dumbbells.
Environmental Controls: Subflooring and Matting
Storage longevity isn't just about the rack; it's about what the rack sits on. Dropping 50-lb hex dumbbells onto a steel rack resting on bare concrete creates a shockwave that travels up the frame, loosening hardware and cracking concrete over time. Furthermore, bare concrete "sweats" during seasonal humidity shifts, wicking moisture directly into the steel feet of your rack, causing base-rot.
The Solution: Always place your dumbbell rack over 3/8-inch or 1/2-inch thick vulcanized rubber matting. This not only dampens acoustic shock (crucial if your home gym is on a second floor or shares a wall) but also creates a vapor barrier between the concrete slab and your steel rack. Ensure the matting extends at least 4 inches beyond the footprint of the rack to catch errant sweat drips and dropped weights.
Optimizing Your Space for the 30-Minute Window
To truly capitalize on a 30-minute home dumbbell workout, spatial geometry matters just as much as equipment maintenance. Position your horizontal rack directly adjacent to your primary working area (e.g., your adjustable bench or lifting platform) in a "U" or "L" configuration. This reduces the steps taken to retrieve weights to zero.
Additionally, implement a strict "Return to Home" rule. During a fast-paced circuit, it is tempting to drop a pair of 25-lb dumbbells on the floor to immediately grab the 35-lb pair. This not only damages the floor and the dumbbell heads (especially if they are rubber-encased hex models, which can tear at the seams upon impact) but creates a tripping hazard. A well-maintained rack with clearly defined, uncluttered tiers forces disciplined transitions, keeping your heart rate up and your floor space safe.
Frequently Asked Questions
Can I store my dumbbells outside or in an uninsulated garage?
If you must store equipment in an uninsulated garage, avoid chrome and standard rubber entirely. Opt for urethane-coated dumbbells and a powder-coated steel rack. Keep a dehumidifier running in the space to maintain ambient humidity below 50%, and cover the rack with a breathable canvas tarp to protect against dust and airborne moisture.
How do I fix a rubber dumbbell that has become sticky?
Stickiness is a sign of polymer degradation, often caused by exposure to UV light, heat, or harsh cleaning chemicals. You can temporarily halt the degradation by thoroughly scrubbing the dumbbell with a degreaser (like Simple Green), drying it completely, and applying a light coat of talcum powder or a specialized rubber restorer. However, once the chemical breakdown has started, it cannot be fully reversed.
Is it better to buy a pre-assembled rack or a bolt-together modular rack?
For heavy loads exceeding 500 lbs, bolt-together modular racks made from 11-gauge or 7-gauge steel are vastly superior. Pre-assembled, lightweight racks often rely on spot-welds and thinner 14-gauge steel that can warp under the dynamic load of returning heavy dumbbells. Modular racks allow you to replace individual worn cradles and re-torque hardware, ensuring a lifespan of 15+ years.
Ultimately, treating your dumbbell rack and storage solutions with the same respect as your programming is the key to long-term home gym success. By controlling environmental factors, respecting material science, and maintaining structural hardware, you guarantee that your gear is always ready to support your next 30-minute home dumbbell workout without missing a beat.
More gear to consider
All reviews
Under Desk Treadmill Packing: Office Maintenance & Longevity Tips

Dumbbell Wood Chop Muscles Worked: Neoprene Grip & Form Fixes
EZ Curl vs Straight Bar Care & Dumbbell Upright Storage

Rubber vs Urethane Dumbbells: Maintenance & Dumbbell Set Rack Care
Power Rack vs Squat Rack vs Squat Stand: Incline Dumbbell Raises