Rowing Machine Setup & Technique: Why Treadmill Music Ruins Erg Pacing
Master your rowing machine setup and technique. Learn why standard treadmill music pacing fails on the erg and how to optimize your 2026 home gym.

The 2026 Rowing Machine Buying Guide: Footprint and Hardware Realities
Bringing an indoor rowing machine into your home gym is one of the most effective cardiovascular investments you can make. However, unlike stationary bikes or ellipticals, rowers demand significant spatial awareness, precise biomechanical setup, and a fundamental shift in how you approach pacing and audio cues. Whether you are looking at the legendary Concept2 RowErg, the immersive Hydrow, or magnetic alternatives like the NordicTrack RW900, understanding the physical footprint and installation requirements is step one.
| Model (2026 Lineup) | Resistance Type | Footprint (L x W) | Setup Time | Audio Integration |
|---|---|---|---|---|
| Concept2 RowErg (Standard) | Air | 96" x 24" | 30 mins | PM5 Bluetooth (App required) |
| Hydrow (Gen 3) | Electromagnetic | 86" x 25" | 45 mins | Native HD Audio / Bluetooth |
| NordicTrack RW900 | Magnetic | 82" x 21" | 60 mins | iFIT Integrated Audio |
Before purchasing, measure your dedicated space. You need a minimum of 110 inches of length and 36 inches of width to allow for full slide extension and handle clearance. Furthermore, modern smart rowers require proximity to grounded power outlets, whereas air rowers like the Concept2 rely on user-generated power and can be placed anywhere.
Complete Installation Walkthrough: Beyond the Manual
Most manufacturer manuals gloss over the critical nuances of subfloor preparation and hardware calibration. A poorly installed rower will rattle, degrade your floorboards, and skew your performance metrics.
Step 1: Subfloor Preparation and Matting
Never place a rowing machine directly on plush carpet or bare hardwood. The repetitive lateral force and sweat corrosion will ruin your flooring. Invest in a 3/4-inch thick, high-density EVA foam mat (Shore C 60+ rating). This specific density absorbs the micro-vibrations from the flywheel and prevents the machine from "walking" across the room during high-drag sprint intervals.
Step 2: Rail Alignment and Hardware Tensioning
When bolting the front and rear monorail sections together (common on the Concept2 and NordicTrack models), use a torque wrench set to the manufacturer’s exact specification (usually 15-20 Nm). An under-tightened rail joint will create a microscopic "bump" that you will feel every time the seat carriage crosses the seam, eventually leading to premature wear on the seat rollers.
⚠️ Installation Warning: Never use WD-40 on your rowing machine chain or rail. WD-40 is a solvent, not a lubricant. It will strip existing factory grease and attract dust, creating a grinding paste. Use only purified mineral oil or the manufacturer's specific chain lubricant applied every 50 hours of use.Step 3: Monitor Pairing and Firmware Updates
Before your first stroke, connect the PM5 (or equivalent smart monitor) to Wi-Fi or via USB to download the latest 2026 firmware. This ensures accurate drag factor calculations and patches Bluetooth latency issues that can disrupt third-party racing apps like EXR or Zwift.
The "Treadmill Music" Trap: Why High-BPM Playlists Destroy Rowing Form
Many athletes transitioning from running make a critical, form-destroying error: they queue up their high-BPM treadmill music playlists and try to match the beat on the erg. This is a biomechanical disaster waiting to happen.
Running cadence typically sits between 160 and 180 steps per minute (SPM). Consequently, your go-to treadmill music is engineered with 160-180 BPM (beats per minute) to match your foot strikes and keep you in a rhythmic flow state. When you sit on a rowing machine, your target stroke rate is drastically lower—usually between 24 and 32 SPM for steady-state erging, and rarely exceeding 40 SPM even during Olympic-level sprints.
The Danger of Rushing the Slide
If you attempt to row to the beat of a 170 BPM treadmill track, you will inevitably rush the recovery phase. Proper rowing technique demands a 1:2 drive-to-recovery ratio. The explosive drive (pushing with the legs) should take one beat, while the active recovery (gliding back to the catch) should take two beats. Concept2's official technique guide emphasizes that rushing the slide to match a fast musical tempo forces you to slam your body weight into the front stops, placing massive shear force on your lumbar spine and robbing the flywheel of its momentum.
Audio Pacing Solution: Instead of standard treadmill music, curate playlists with 60 to 90 BPM tracks. This allows you to map the heavy "downbeat" to the catch and drive phase, and the slower melodic progression to your recovery glide. Alternatively, use the native audio pacing features on 2026 smart rowers like the Hydrow, which sync music dynamically to your target stroke rate rather than forcing you to chase a static beat.
Biomechanical Setup: Dialing in the Foot Stretchers and Damper
Before you take a single stroke, you must calibrate the machine to your specific anthropometrics.
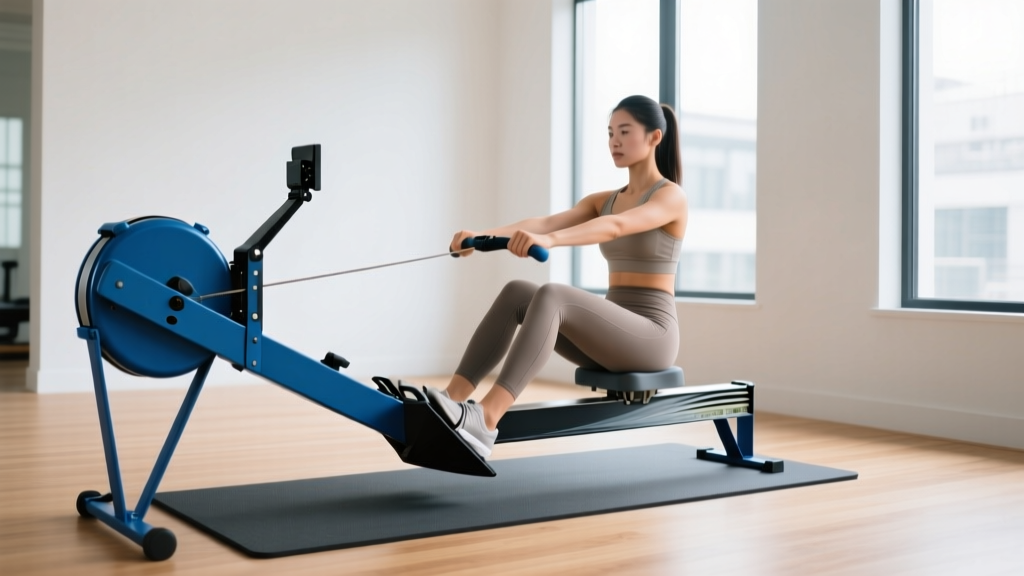
- Foot Stretcher Height: Adjust the heel cups so that the strap crosses exactly at the ball of your foot (the metatarsophalangeal joints). If the strap is too high, you will lack ankle dorsiflexion at the catch, causing you to compensate by lifting your heels and losing power transfer.
- The Damper Myth: Stop setting the air damper to 10. A setting of 10 is akin to riding a bicycle in the heaviest gear; it causes rapid muscular fatigue without yielding cardiovascular benefits. According to USRowing's sports science resources, elite rowers typically set their drag factor between 110 and 130, which on a standard Concept2 RowErg corresponds to a damper setting of 3 to 5. This mimics the hydrodynamic drag of a sleek racing shell on water.
Technique Walkthrough: The Four Phases of the Stroke
Rowing is not an upper-body pulling exercise; it is a lower-body pushing exercise that happens to involve the arms. Power distribution should be exactly 60% legs, 30% core/hips, and 10% arms.
1. The Catch
Shins are vertical (not past vertical). Arms are fully extended, lats are engaged, and your torso is leaned forward at roughly 11 o'clock. Your chest should be resting comfortably on your thighs.
2. The Drive
Initiate the movement by pushing the footplate away. Your arms remain completely straight until your legs are 80% extended. Only then does the core swing open to 1 o'clock, followed finally by the arms drawing the handle to the lower sternum.
3. The Finish
The handle taps the body, wrists are flat, and the core is braced. There is no pause here; the finish is a fluid transition point.
4. The Recovery
Arms extend first, the torso hinges forward past 12 o'clock, and only then do the knees bend to glide back to the catch. Remember: let the treadmill music stay on the treadmill. Here, you control the rhythm, breathing in during the recovery and exhaling sharply on the drive.
Frequently Asked Questions
Can I use my Bluetooth headphones with the Concept2 PM5?
Yes, but not directly. The PM5 uses Bluetooth Low Energy (BLE) for data transmission to apps. To use wireless headphones, you must connect them to the tablet or smartphone running your rowing app (like ErgData or EXR), which then pulls the audio from your device while receiving stroke data from the PM5.
How often should I check the monorail for debris?
Wipe down the stainless steel or aluminum monorail with a damp microfiber cloth after every single session. Sweat contains high levels of sodium and lactic acid, which will rapidly corrode the metal and create pitting that ruins the smooth glide of the seat carriage.
More gear to consider
All reviews
Elliptical vs Treadmill Care: What Was It Originally Invented For?
One Hour on a Treadmill: Noise Level Head-to-Head Comparison
Treadmill Muscles Worked: Feature Comparison & Buying Mistakes
Life Fitness Run CX Treadmill vs Curved Manual: Beginner Guide

Elliptical vs Treadmill: Home Cardio Budget & Treadmill Plug Costs
