
Beyond the 2 Pound Dumbbell: Power Rack vs Squat Rack Guide
Transitioning from a 2 pound dumbbell to heavy barbell lifts? Compare power racks, squat racks, and squat stands with our step-by-step beginner guide.

From Rehab to Heavy: Outgrowing the 2 Pound Dumbbell
Every home gym journey starts somewhere. For many beginners, that starting point is a simple 2 pound dumbbell used for physical therapy, rotator cuff warm-ups, or light shadow boxing. It is an unassuming piece of equipment that introduces you to the fundamentals of resistance. However, as your strength adapts and your goals shift toward compound barbell movements like squats, bench presses, and overhead presses, that lightweight vinyl-coated bell quickly becomes obsolete. You need a barbell, and more importantly, you need a safe place to put it.
Transitioning from free-flowing dumbbell work to heavy barbell training requires a containment system. But walking into the world of gym racks can feel overwhelming. Do you need a full cage? Is a half rack sufficient? Will a minimalist squat stand fit your low-ceiling garage? This step-by-step guide will walk you through the exact specifications, pricing, and safety considerations of choosing between a power rack, a squat rack, and a squat stand in 2026.
Step 1: Decode the Steel — Upright Sizes and Hole Spacing
Before comparing rack styles, you must understand the language of rack steel. The uprights (the vertical posts) dictate the rack's stability, weight capacity, and attachment compatibility. In the modern home gym market, there are two primary standards:
- 2x2 Inch Uprights (14-Gauge Steel): Typically found in budget racks (under $350). These use 1-inch diameter holes and are generally rated for 600 to 800 lbs. While sufficient for absolute beginners, they lack the rigidity for heavy kipping pull-ups or advanced attachment ecosystems.
- 3x3 Inch Uprights (11-Gauge Steel): The gold standard for mid-tier to premium racks ($500 to $1,500+). The 11-gauge steel is approximately 0.120 inches thick, offering immense rigidity and weight capacities exceeding 1,000 lbs. Most premium attachments (lat pulldowns, belt squat mechanisms) are designed specifically for 3x3 uprights.
Expert Insight: The 'Westside' Hole Spacing Advantage
When shopping for a 3x3 rack, look for Westside hole spacing. Standard racks have holes spaced 2 inches apart. Westside spacing features 1-inch hole spacing in the 'bench and squat zone' (the lower half of the upright). This allows you to adjust your J-cups with micro-precision, ensuring you don't have to waste energy lifting the barbell an extra two inches just to clear the hooks during a max-effort bench press.
Step 2: The Showdown — Power Rack vs. Squat Rack vs. Squat Stand
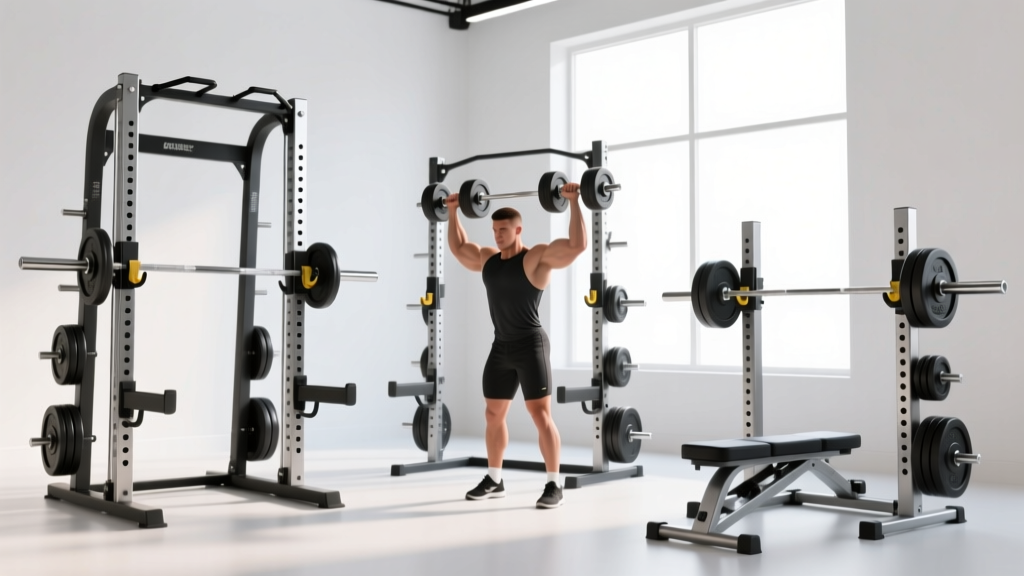
Now that you know what the racks are built from, let us break down the three main architectural styles. Your choice will depend heavily on your ceiling height, floor space, and whether you plan to lift alone.
| Feature | Power Rack (Full Cage) | Squat Rack (Half Rack) | Squat Stand |
|---|---|---|---|
| Uprights | 4 to 6 | 2 Main + 2 Rear Storage | 2 Independent or Bolted |
| Avg. Footprint | 48' x 48' or 49' x 49' | 50' x 50' (wider base) | 48' x 48' (compact base) |
| Height Range | 80' to 90' (Standard) | 80' to 90' | 70' to 85' (Great for low ceilings) |
| Solo Lifting Safety | Excellent (Enclosed safeties) | Good (Requires long spotter arms) | Poor to Fair (High tipping risk) |
| 2026 Price Range | $350 - $1,500+ | $500 - $1,200 | $150 - $450 |
| Best For | Heavy solo squats/bench, beginners | Olympic lifters, garage gyms | Tight spaces, low ceilings, budget |
1. The Power Rack (Full Cage)
A power rack consists of four main uprights connected by crossmembers at the top and bottom, creating an enclosed 'cage.' Models like the REP Fitness PR-4000 or the Rogue RM-490M Monster Lite allow you to step inside the rack to perform squats and bench presses. Why it wins for beginners: If you fail a rep, the barbell simply drops onto the safety spotter arms or straps contained within the cage. There is virtually zero risk of the rack tipping over. The main drawback is the physical footprint and the visual bulk it adds to a room.
2. The Squat Rack (Half Rack)
Half racks feature two main front uprights and two shorter rear uprights that double as weight plate storage. The Titan Fitness T-3 Half Rack is a prime example. The rear weight storage acts as a crucial counterbalance, preventing the rack from tipping forward when you rack a heavy barbell. Half racks are favored by Olympic weightlifters because the open front allows for dynamic movements like power cleans and snatches, where you might need to dump the bar forward. However, they require heavy-duty, extended spotter arms to be safe for solo bench pressing.
3. The Squat Stand
Squat stands are the most minimalist option, consisting of just two uprights. Premium models like the Rogue SML-1 Monster Lite Squat Stand feature heavy steel gussets at the base to improve stability. While they are incredibly space-efficient and often come in 'short' versions (72 inches) for rooms with low ceilings, they carry inherent risks. According to safety guidelines emphasized by the American Council on Exercise (ACE), free-standing minimalist equipment requires strict attention to center-of-gravity and spotting protocols. If you miss a heavy squat backward, a squat stand can easily tip over unless it is securely bolted into a concrete floor or a reinforced wooden platform.
Step 3: Factor in the 'Hidden' Rack Costs
Beginners often make the mistake of budgeting solely for the rack itself. In reality, the rack is just the chassis. To build a functional, safe station, you must account for essential accessories:
- Safety Spotter Arms or Straps ($60 - $150): Many budget racks include basic pin-pipe safeties, but upgrading to UHMW plastic-lined safety straps protects your barbell's knurling and is much easier to adjust between sets.
- Weight Storage Pegs ($40 - $80): If you choose a power rack or squat stand, you must buy separate storage pegs to keep your floor clear and, in the case of squat stands, add vital counterbalance weight to the base.
- Pulling Up Bar ($50 - $100): While most power racks include a basic straight pull-up bar, you may want to upgrade to a multi-grip or angled bar for better elbow ergonomics.
- Floor Protection ($150 - $300): You cannot drop iron plates on bare concrete or garage epoxy. You will need 3/4-inch thick vulcanized rubber horse stall mats to absorb the kinetic energy and protect your subfloor.
Step 4: Establish a Safe Solo-Lifting Protocol
When you were using a 2 pound dumbbell for mobility work, dropping the weight was harmless. Dropping a 225-pound barbell is a structural and biological hazard. The Mayo Clinic's guidelines on strength training safety heavily emphasize the use of spotters or mechanical safety catches when lifting near muscular failure.
The Solo Bench Press Rule
Never bench press alone without safety spotter arms set exactly one inch below your chest's maximum arch. If you use a squat stand for benching, ensure the spotter arms are rated for the load and that the stand's base is weighted down with heavy bumper plates. If your room permits, a full power rack is always the superior choice for solo horizontal pressing.
Step 5: Bridging the Gap — Your New Warm-Up Routine
Just because you have upgraded to a 1,000-pound capacity power rack does not mean your beginner equipment is useless. In fact, integrating your original lightweight gear into your new barbell routine is a hallmark of intelligent programming.
Before you unrack the barbell for heavy squats, use your 2 pound dumbbell to perform targeted rotator cuff external rotations and scapular retractions. This pre-fatigues the stabilizing muscles of the shoulder girdle, creating a more secure 'shelf' for the barbell during back squats and protecting the joint during heavy bench presses. The journey from a 2 pound dumbbell to a fully loaded power rack is not about discarding the basics; it is about layering advanced tools over a foundation of mindful movement.
Final Verdict: Which Rack Should You Buy?
If you have an 8-foot or higher ceiling, adequate floor space, and prioritize safety above all else, invest in a 3x3 Power Rack with Westside spacing. It is the most versatile, safest, and most future-proof investment a beginner can make. If you are an aspiring Olympic lifter who needs open space to drop the bar forward, opt for a Half Rack with heavy rear storage. Finally, if you are outfitting a basement with a 7-foot ceiling or have a strict budget under $300, a Squat Stand will get the job done—provided you respect the tipping hazards and bolt it down securely.
More gear to consider
All reviews
Dumbbell Rack Maintenance: Protecting Weights for Dumbbell Arm Raises
Power Rack vs Squat Rack vs Stand: Dumbbell Shoulder Workouts (Pics)

Best Neoprene Dumbbells & Your 4-Week Dumbbell Exercise Schedule

Power Rack vs Squat Rack vs Stand: Alternating Dumbbell Shoulder Press

Incline Dumbbell Bench Press Form: Urethane vs Rubber Care
