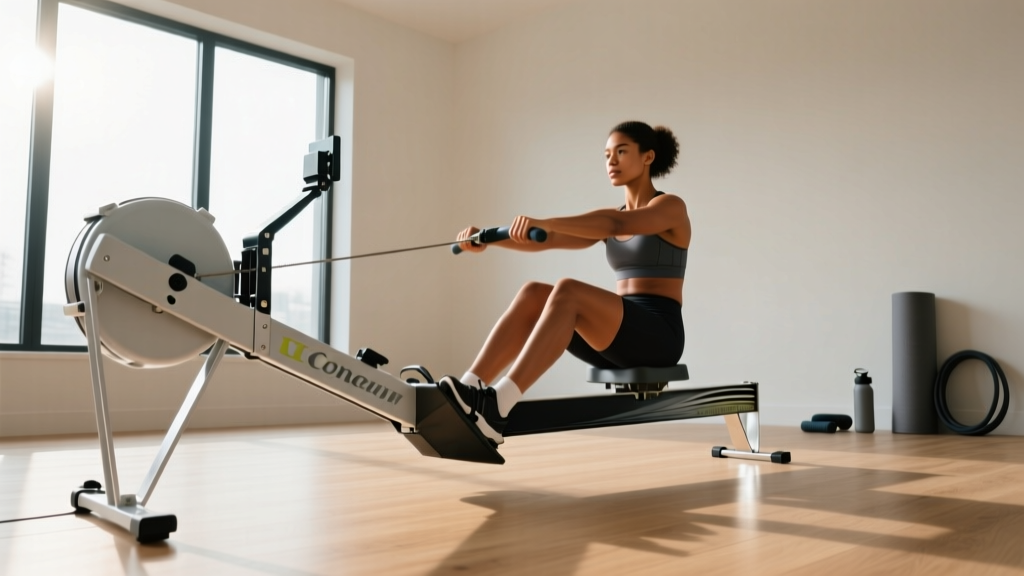
Beyond the Treadmill Horse: Rowing Machine Setup & Technique
Discover how to choose, install, and master the rowing machine. Our complete setup walkthrough and technique guide builds your ultimate home cardio engine.

Before the advent of modern fitness equipment, the 'treadmill horse'—a literal horse walking on a sloped, endless track—was the standard for generating continuous mechanical power in the 19th century. These massive wooden treadwheels required immense, sustained torque and perfect rhythmic balance. Today, we channel that same continuous, high-torque output into human performance through the modern rowing ergometer. While you no longer need an equine partner to generate wattage, mastering the rowing machine requires just as much precision in its setup, spatial footprint, and biomechanical technique.
Whether you are upgrading your home gym in 2026 or installing your first cardio machine, this comprehensive walkthrough will guide you through selecting the right ergometer, executing a flawless installation, and mastering the four phases of the rowing stroke.
Rowing Machine Buying Guide: Choosing Your Ergometer
The indoor rowing market has evolved significantly, branching into three primary resistance categories: air, magnetic, and water. Your choice dictates not only the feel of the stroke but also the acoustic footprint and maintenance requirements of your home gym.
| Model | Resistance Type | Approx. Price (2026) | Footprint (L x W) | Best For |
|---|---|---|---|---|
| Concept2 RowErg | Air | $1,000 | 94" x 24" | Competitive athletes, CrossFit, data purists |
| Hydrow | Electromagnetic | $2,495 | 86" x 25" | Tech-forward users, immersive scenic rowing |
| NordicTrack RW900 | Magnetic | $1,699 | 86" x 22" | Quiet home environments, interactive coaching |
Expert Insight: If your home gym is in a shared living space or apartment, avoid air resistance. The whoosh of the flywheel can exceed 75 decibels at high stroke rates. Magnetic and electromagnetic rowers operate at under 50 decibels, making them ideal for early morning or late-night sessions.
Space Planning and the 'Horse Stall' Mat Secret
A common failure mode in home gym setups is underestimating the dynamic clearance required for rowing. While the machine itself may measure 8 feet long, you must account for the user's body and the handle's full extension.
- Minimum Clearance: 9 feet long by 4 feet wide.
- Ceiling Height: Standard 8-foot ceilings are sufficient, but if you are taller than 6'2" and plan to do off-machine dynamic movements or stretching, verify your overhead clearance.
- Floor Protection: Here is where the 'horse' connection returns. The industry secret for dampening the harmonic vibration of air and magnetic rowers is using a 3/4-inch thick vulcanized rubber mat—often sold at agricultural supply stores as a horse stall mat. These dense, heavy-duty mats prevent the machine from 'walking' across hardwood floors during aggressive drive phases and absorb acoustic vibrations far better than thin, cheap PVC equipment mats.
Complete Installation Walkthrough
Most premium rowing machines arrive partially assembled, but improper tightening of the rail and stabilizers can lead to catastrophic derailment or uneven stroke resistance. Follow this step-by-step installation protocol:
- Unboxing and Staging: Lay the main beam on your rubber mat. Do not drag the beam across the floor, as this can damage the internal track or the exterior finish.
- Attaching the Front Stabilizer: Align the front leg assembly with the pre-drilled holes on the main beam. Insert the M8 hex bolts. Critical Step: Use a torque wrench set to 15 Nm (or tighten firmly with a 14mm wrench) in a star pattern to ensure the frame sits perfectly level. An uneven front stabilizer will cause the seat carriage to pull to one side.
- Securing the Monitor Arm: Route the data cable through the hollow aluminum arm before bolting it to the flywheel cage. Pinching this cable is the number one cause of dead monitors on new setups.
- Chain and Bungee Inspection: Pull the handle to full extension. The chain should retract smoothly. If it hesitates, the internal bungee cord tension may need adjustment via the screw located near the flywheel housing (refer to your specific model's manual for the exact turn count).
- Leveling the Rear Feet: Sit on the machine at the 'catch' position. If you feel any rocking, adjust the threaded rubber feet on the rear stabilizer until the frame is planted firmly against the mat.
Mastering the Biomechanics: The Four Phases
According to the Concept2 official technique guide, rowing is not an upper-body pulling exercise; it is a lower-body pushing exercise that happens to involve the arms. The power distribution should be roughly 60% legs, 30% core, and 10% arms.
1. The Catch
This is the starting position. Your shins should be vertical (or as close to vertical as your ankle mobility allows). Your arms are fully extended, gripping the handle loosely at the 11 o'clock angle. Your core is braced, and your lats are engaged, preparing to transfer power from the footplate to the handle.
2. The Drive
The sequence is strictly Legs -> Core -> Arms. Push explosively through your heels. Do not open your hips until your legs are nearly straight. Once the legs are engaged, swing the torso back to the 1 o'clock position, and finally, draw the handle into your lower sternum. As noted by the American Council on Exercise (ACE), initiating the drive with the arms or back is a primary cause of lumbar strain in novice rowers.
3. The Finish
The handle rests just below the pecs, wrists are flat, and the torso is leaned back slightly past vertical. The legs are fully extended but not hyper-locked. This is a momentary pause of maximum tension before the release.
4. The Recovery
The recovery is the exact reverse of the drive: Arms -> Core -> Legs. Extend the arms fully, hinge forward from the hips until your torso passes your knees, and only then allow the knees to bend, sliding the seat forward to the catch. The recovery should take twice as long as the drive, establishing a 1:2 work-to-rest ratio.
"The rowing machine is a mirror. If you rush the recovery, you steal time from the flywheel to spin down, robbing yourself of the momentum needed for a powerful subsequent catch. Patience on the slide is the hallmark of an elite rower." — Elite Ergometer Coaching Principles
Calibrating Your Drag Factor
A pervasive myth in home gyms is that setting the damper lever to '10' yields the best workout. In reality, a damper setting of 10 mimics rowing a heavy, slow wooden scull, while a setting of 3 to 5 mimics the sleek, hydrodynamic glide of an Olympic racing shell.
How to find your true Drag Factor: On a Concept2 PM5 monitor, navigate to More Options -> Display Drag Factor. Begin rowing at a steady 24 strokes per minute. The screen will display a number between 90 and 200. For most aerobic conditioning and weight loss, a drag factor between 110 and 130 is optimal. Adjust the physical damper lever on the side of the cage until the screen reads within this range. This accounts for dust buildup in the flywheel and local air density, ensuring your workout is perfectly calibrated.
Routine Maintenance for Longevity
To keep your machine operating as smoothly as a well-oiled treadmill horse of the industrial era, adhere to this maintenance schedule:
- After Every Session: Wipe down the monorail with a damp cloth and mild soap. Sweat contains salt and urea, which will crystallize on the track and cause the seat rollers to grind and flatten over time.
- Weekly: Inspect the chain for dry spots. Apply a single drop of purified mineral oil or 3-in-One oil to a paper towel and run the chain through it. Never use WD-40, as it attracts abrasive dust.
- Bi-Annually: Vacuum the flywheel cage. Dust ingestion acts as a brake on the air fan, artificially inflating your drag factor and forcing you to work harder for the same wattage output.
For a deeper dive into the cardiovascular and muscular endurance benefits of incorporating rowing into your weekly routine, review the clinical insights provided by the Cleveland Clinic's guide to rowing workouts. By respecting the spatial requirements, executing a precise installation, and honoring the biomechanical sequence of the stroke, your rowing machine will become the most effective, full-body cardio engine in your home.
More gear to consider
All reviews
LifePro Pacer Folding Treadmill Belt Maintenance Guide

Curved vs Motorized Treadmill or a Treadmill and Stair Climber Combo?
Walking Pad Review: How to Unlock Treadmill Safety Features

Treadmill Cardio Workout Noise: 2026 Machine Comparison
Manual vs Motorized Treadmills: Setup with RUNN Treadmill Sensor
